Get more good stuff.
We’ve already discussed the idea and agreement needed to proceed with a project. In step #2, we’ll come up with a plan to get the work done.
This is the second of the 5-post series on how to manage a project. The 5 key steps to managing a project are:
- Idea Approval – What do you want to do? Why?
- Plan – How are you going to do it?
- Execute – Let’s get it done!
- Check and Control – Keep the project on track.
- Close – Wrap up the project.
Plan – How are you going to do it?
According to analysis of 163 companies in a ZDNet article, 37% of projects fail. The top 5 reasons are related to planning.
Planning gives you the tools and insight needed to overcome issues and keep projects on track.
In this phase we’ll better understand the people involved with a project, define detailed requirements, determine tasks and estimates, and create a schedule and budget.
People
Project Team
By approving the idea, you or your sponsor (person funding the project) have agreed to provide a project team according to the roles you outlined in the Idea Approval phase. A project team includes those working directly on the project. A good team is essential to a successful project.
Stakeholders
Stakeholders are simply people with interest in the project. Your project team members are stakeholders; so are customers, employees, vendors, and the project sponsor.
Powerful advocates can clear pathways and accelerate your project. Powerful opponents can build barriers.
Power / Interest Grid
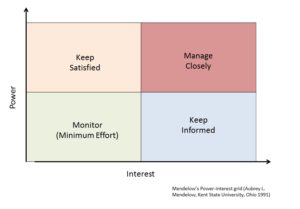 The Power / Interest Grid is a great tool for categorizing your stakeholders. Those with high power and high interest need to be managed closely, while stakeholders with low interest and power can be monitored with minimal effort. This grid will help you focus your time where it’s needed most.
Some people can be very sensitive about where they are placed on the grid, so it’s best to keep this information private.
Stakeholder power and interest can change throughout the course of the project, so this chart should be updated as necessary.
Now that we know the project team and identified stakeholders, we can officially kick-off the project!
Kickoff Meeting
The purpose of the kickoff meeting is to gather the project team together, introduce the project, and set expectations.
- Team Introductions
- You could ask people to share an interesting fact about themselves, but please avoid the painful icebreakers!
- Review Project Charter – you created this summary in the Idea Approval phase
- Spend time on WHY you’re doing the project. If things get difficult, this will be a source of motivation.
- Review the scope and answer any questions. The scope will eventually be developed into specific requirements.
- Add / change the issues and risks with the team’s input.
- Share key milestones included on the schedule estimates. I’ve found that costs aren’t really valuable information for the team, so I don’t review these in detail.
- Review and modify roles and responsibilities.
- Set Expectations
- Ask that you’re notified when there are new issues and risks. Also ask for a plan to address the issue / risk.
- Request status updates at a certain frequency (e.g. weekly- “I’m on track, ahead, or behind”).
- Share your communication plan. Be mindful of everyone’s time – only meet and communicate with a purpose.
Requirements
Requirements elaborate on the scope statement and describe what customers need, want, and expect as a solution to their problem(s).
Customers, whom can be internal or external to your organization, should be involved with creating the requirements. Information can be gathered through interviews, focus groups, surveys, trends, and observation.
Requirements are typically written descriptions or prototypes. Prototypes provide a way to get instant feedback and work through iterations. Whatever the method, requirements must be agreed upon by the customer representative and project manager in order for the project to succeed.
How detailed should requirements be?
As each project is different, the detail of requirements can vary. However, requirements should have the following characteristics:
- clear and specific to avoid ambiguity;
- describe what is needed, not how to achieve it;
- can be verified that they were fulfilled.
For example, if a requirement for a new car stated that “it should be fast”, we can see that it is ambiguous and cannot be verified (how fast? relative to what?). Additionally, a requirement specifying where the welds on the car should be placed in order to achieve optimal speed are far too detailed. (Can you tell I know nothing about cars??)
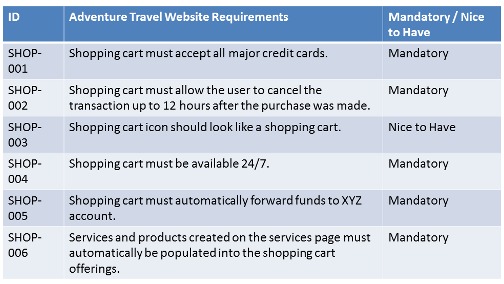
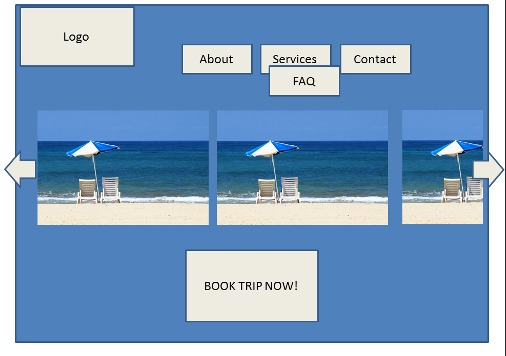
Let’s continue to use the new website for our adventure travel business as an example project. The following are some requirements for the site:
Tasks and Estimates
By knowing what’s required for the project, we can plan tasks and estimate the work that need to be done.
Work Breakdown Structure (WBS)
A work breakdown structure (WBS) is a hierarchical representation of the work involved with the project. See the following using our website example:
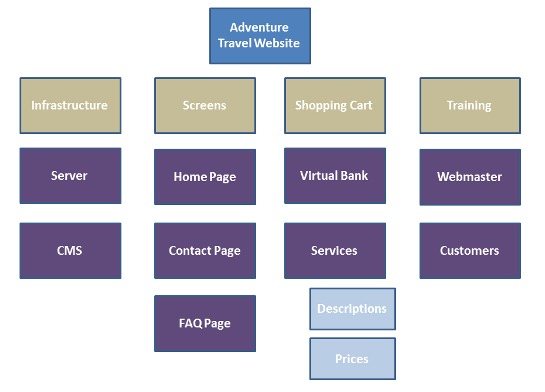
The project is listed at the very top of the chart and is comprised of work streams (tan boxes). Each work stream represents a category of tasks that will eventually be assigned to a team member.
 How to Make a Work Breakdown Structure
Write Down Deliverables:
- Hand out sticky notes and a marker to your project team.
- After a refresher on the scope and requirements, ask the team to write down one deliverable per sticky note and put it on a wall for everyone to see.
- A deliverable is a service, product, or result that needs to be completed as part of the project.
- Start with major deliverables, called work streams, and continue breaking these down into smaller components.
- Keep repeating step 3 until all deliverables are determined.
Level of Detail:
- Continue to expand upon the deliverables until the work can be assigned to a team member and managed by a project manager.
- I recommend the 80 hour rule for medium to large projects – keep expanding on a deliverable until it takes about 80 hours to complete that task.
- Verify with the team that all of the deliverables are included.
Each project should include tasks for quality checks and training.
Estimating
Do you remember how difficult it was to get an accurate estimate in the Idea Approval phase? There was so much unknown at that time. Now that we know what to do (requirements) and the tasks to do it (WBS), we can create a much better estimate.
Estimating can be done in a variety of ways. Here are 3 techniques that I recommend:
1. Historical Data
If we know how long something took in past projects, we can use that estimate for new projects. The more data we have from past, the better our future estimates can be.
If you have the data, start here. When you don’t have data, ask an expert.
2. Expert Knowledge
This is simply asking an expert “how long will it take?” This is quick, fairly accurate, and commonly used.
If there are not experts on some tasks, move on to the next method of 3-point estimates.
3. Three Point Estimating
For each lowest-level task from the WBS, the person assigned to that task will provide 3 estimates:
- Optimistic – how many hours will the task take in a best case scenario
- Pessimistic – how many hours will the task take in a worst case scenario
- Realistic – how many hours will the task most-likely take
Each of these estimates goes into the following calculation:

The result accounts for the ranges of the estimate while providing heavier weight to the realistic estimate.
Contingency for Risk
Although we have a clearer picture of what the project involves, there are still risks that face the project.
- For known risks add contingency or extra time and costs that are tied to a specific risk.
- For example, let’s say we had a probable risk that a key stakeholder might change roles during the course of the project. We would account for this by adding time and money for what it may take to train a new stakeholder. If we get to a point in the project where the risk can be removed (i.e. the key stakeholder stayed in the same role), the additional time and costs should also be removed from our project.
- For unknown risks add a percentage of contingency to the project.
- If the project is well understood (e.g. historical experience or it’s not complex) add 0 – 5%.
- If the project has a lot of uncertainty (e.g. never been done before, complex) add 10 – 20%.
Ensure that your team is aware of your contingency planning so they don’t add extra time to their estimates.
Schedule and Budget
Using the estimates, it’s now time to sequence and schedule the project.
Work with your team to determine dependencies (e.g. Task C can only start when Task A is complete) and tasks that can be done in in parallel. Be creative with planning to ensure that you make the most use of everyone’s time.
Availability
Include vacation time and account for other projects that your team members may be assigned to.
Even if a someone is allocated to your project full-time, this doesn’t mean that they have 8 hours each day to give. Consider all of the emails, meetings, conversations, and breaks (check out this article on wasted time) that are involved in a typical day. Because of these factors, I assume that 70% of a day is spent doing actual work and factor that into my schedule.
Example Schedule:

Budget
Costs for the project include internal labor estimates and equipment, vendor, and service costs. The latter are typically defined by contracts in which the vendor provides estimates or the price is known.
Labor costs are estimated by using historical data or multiplying time estimates by a per hour figure (e.g. $50 / hour).
Tools
Microsoft Project is a powerful tool for scheduling a project and assigning tasks, but usually runs at a high cost. There are online solutions like Wrike and Basecamp that offer free features that can be great for small teams. Even a spreadsheet can do the trick for smaller projects.
Negotiation
There will be pressure to bring in the timeline and reduce costs. The requirements will be challenged. Expect your project plan to change during these negotiations. While these discussions occur, keep the Project Management Triangle in mind:
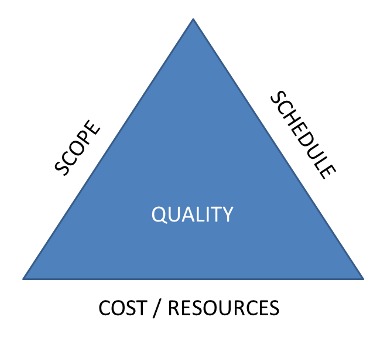
This triangle shows that every project has constraints – a limited scope, budget, and schedule. If one of the sides is changed, at least one other must change too.
For example, if the schedule must be shorter that would mean that the scope would need to be reduced or the cost would need to increase.
There is a lot involved with planning, but the effort is well worth it! Stay tuned for our next lesson where we’ll put our plan to work and Execute it!
 Important tips!
I’ve made a lot of mistakes while managing projects and I want to help you avoid making the same ones. Here are some additional tips that will save you major headaches:
Why Don’t We All Just Get Along?
In the 1960s, researcher Bruce Tuckman determined the phases of teamwork. By being aware of these 5 phases, we can better build our teams.
 Forming: The very beginning of a project when a team is being formed. Not much conflict as people are trying to “fit in” and understand the goals of the project.
Storming: This stage is full of conflict. Initial trust has been established and therefore people feel more comfortable with challenging each other. I’ve found that defining roles and responsibilities can trigger the storming phase.
Norming: People understand the goal and concede with some of their previous arguments in order to advance the project and avoid conflict. One thing to watch out for here is people may be afraid to share new ideas, which may hinder the project.
Performing: Imagine high-fives and chest bumps. This is when the team works the best together and becomes a high-performing team. Not every team gets here, but if they do it is a great feeling!
Adjourning (added in 1977): Goodbyes are hard. After spending a large amount of time working on a challenging goal, people truly become a team. This stage, sometimes referred to as “mourning”, is when the team breaks up because the project is over.
Don’t “Work Backwards”
As you learned from the Project Management Triangle, there are constraints involved with a project. And when one is impacted, the others are too.
I learned this lesson the hard way by working backwards (I recommend you don’t do this). I was given a team, scope, and timeline and told to “work backwards” from the due date. I knew the timeline was far too aggressive, but felt pressure to meet it. So, I worked backwards.
Using the end date, I squeezed every last hour into the schedule by removing contingency, using only optimistic estimates, and assuming my team worked 8 hours a day. You can probably see where this is going…
On paper it worked (sort of), but I was setting the team up for an impossible request – the project failed and I had an over-worked, unhappy team.
Lesson Learned
What I have learned in the planning phase is to look at the project without a date, even if one is given. Using the estimates I have from the team, I “work forwards.” This typically results in an estimated delivery date being past the due date requested and there will be a need to negotiate with stakeholders.
I feel confident going into these negotiations because I have done the research and have all of the data I need. If the due date requested is a hard date and cannot be moved, I can offer suggestions to add more people to the team (increase cost) or remove requirements (reduce scope) in order to meet the date.
This approach sets up the project for success.
